How To Make Easy Halloween Charcuterie Board Skull
This easy to make Skull Frosting Halloween Charcuterie Board will delight your family and friends. Loaded with favorite snack treats it makes an eye catching centerpiece for your Halloween party festivities as well as a quick to make snack board to serve after a night of trick or treating.
Halloween, the most ghoulishly delightful holiday of the year, is a time for creativity and celebration. From haunted houses to pumpkin carving, there’s no shortage of ways to embrace the spooky spirit. One fantastic way to do so is by creating a Halloween charcuterie board skull—a centerpiece that will provide your guests with a wide range of delectable treats. Keep reading to find out more about crafting a Halloween charcuterie board skull as well as lots of tips and tricks to make it a memorable part of your Halloween gathering.
Skull Halloween Charcuterie Frosting Board

Traditionally, charcuterie boards are assembled using a variety of meats like prosciutto and salami slices, along with an assortment of soft cheese. Complementing these main elements are a selection of fresh and dried fruits, nuts, olives, crackers, cherry tomatoes and savory spreads.
This frosting dessert board is a sweet and spooky twist on the traditional savory charcuterie board. You might see this type of dessert board being called a frosting board or a buttercream board.
What is a buttercream or frosting board?
A buttercream board is a type of dessert charcuterie board. It’s made up of two parts….the frosting and the sweet and salty treats that you put the frosting on.
You can use buttercream frosting or your favorite store bought or homemade frosting recipe. Here’s what you’ll need to make this Skull charcuterie board.
Ingredients for Skull Buttercream Dessert Board:
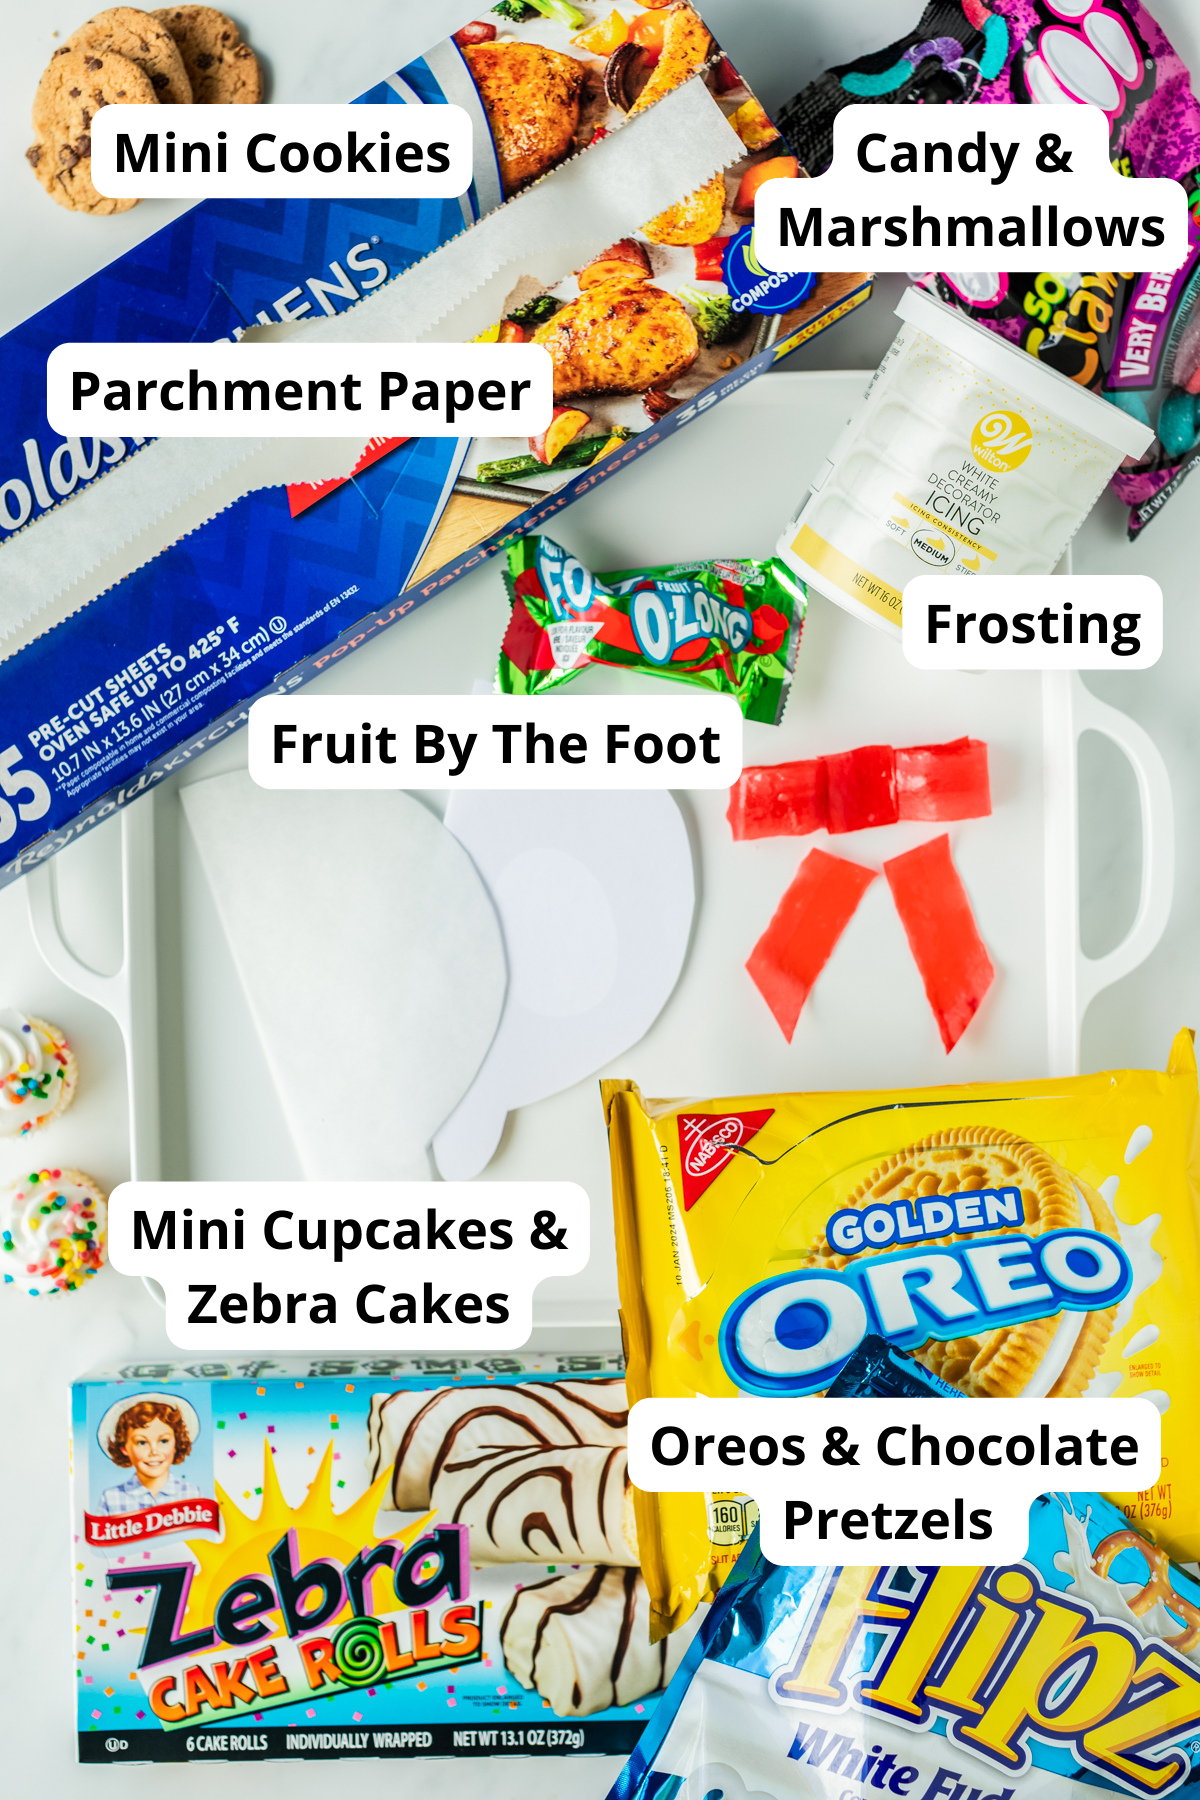
This is just a basic list of ingredients to fill your board. Choose items that you can find in your local store or that your family and friends enjoy. This list is the items that are included in the board in the picture. The size of your items will depend upon the size of your board or serving tray. Smaller boards will look better with mini cookies and cupcakes. Larger boards will have the room for full sized items.
Here’s what’s on this board:
- Fruit by The Foot
- Wilton Ready To Use Frosting – white buttercream
- Black Wilton Sparkle Gel
- Little Debbie Zebra Cake Rolls
- Mini Cupcakes
- Golden OREO Cookies
- Chips Ahoy! Cookies
- Mini Frosted Sugar Cookies
- Mini Chocolate Chip Cookies
- White Chocolate Pretzels
- Mini Marshmallows or small Halloween candies
Other supplies needed for this frosting dessert board:
Square Serving Tray – this square serving tray is 12.5 x 12.5 and can be found on Amazon (affiliate link).
Round Piping Tip – you’ll want a large round piping tip such as a Wilton 1A piping tip (Amazon affiliate link).
Disposable Decorating Pastry Bag – if you don’t have a disposable decorating bag you can always snip the corner off of a large food storage or freezer bag to use in place of a pastry bag. I get my bags at Michael’s craft store but they can also be found on Amazon.
Parchment Paper Sheet – You’ll need a piece of parchment paper the size of notebook paper (8 x 11 inches). You’ll trace the skull on to the parchment paper to create the frosting skull design.
Offset Spatula – offset spatulas make it so much easier to smooth out frosting without having to hold a regular spatula at a weird angle. These can be found in most stores that sell kitchen utensils. You can also find it in the baking section at your local Michael’s craft store as well as on Amazon (affiliate link).
Kitchen Shears or scissors – used to cut out the skull design on the parchment.
How to make this cute Halloween Dessert Board:
Start by preparing the bow using the Fruit By The Food. Cut a strip out to make a loop for the base of the ribbon. Use a dab of frosting to glue the ends together (frost the pieces together in the middle as it will be covered with the next piece).
Cut a small rectangle to wrap around the center of the loop and use frosting to secure it.
Cut two equal strips and secure them to the bottom of the ribbon base. Trim the bottoms at an angle to complete the bow. The picture below shows the bow and the hanging pieces of the ribbon before they are attached.
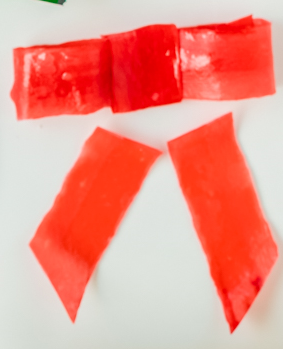
Take the remaining strip and cut in half. Roll each piece and insert them into the center of the bow loops to help give them shape. Adding in these rolled up pieces keeps the loops from being pressed flat and helps them to stand up.
Print out the skull shape from the PDF file that you can download below.
Fit a pastry bag with Round Pastry Tip and fill with all of the white frosting.
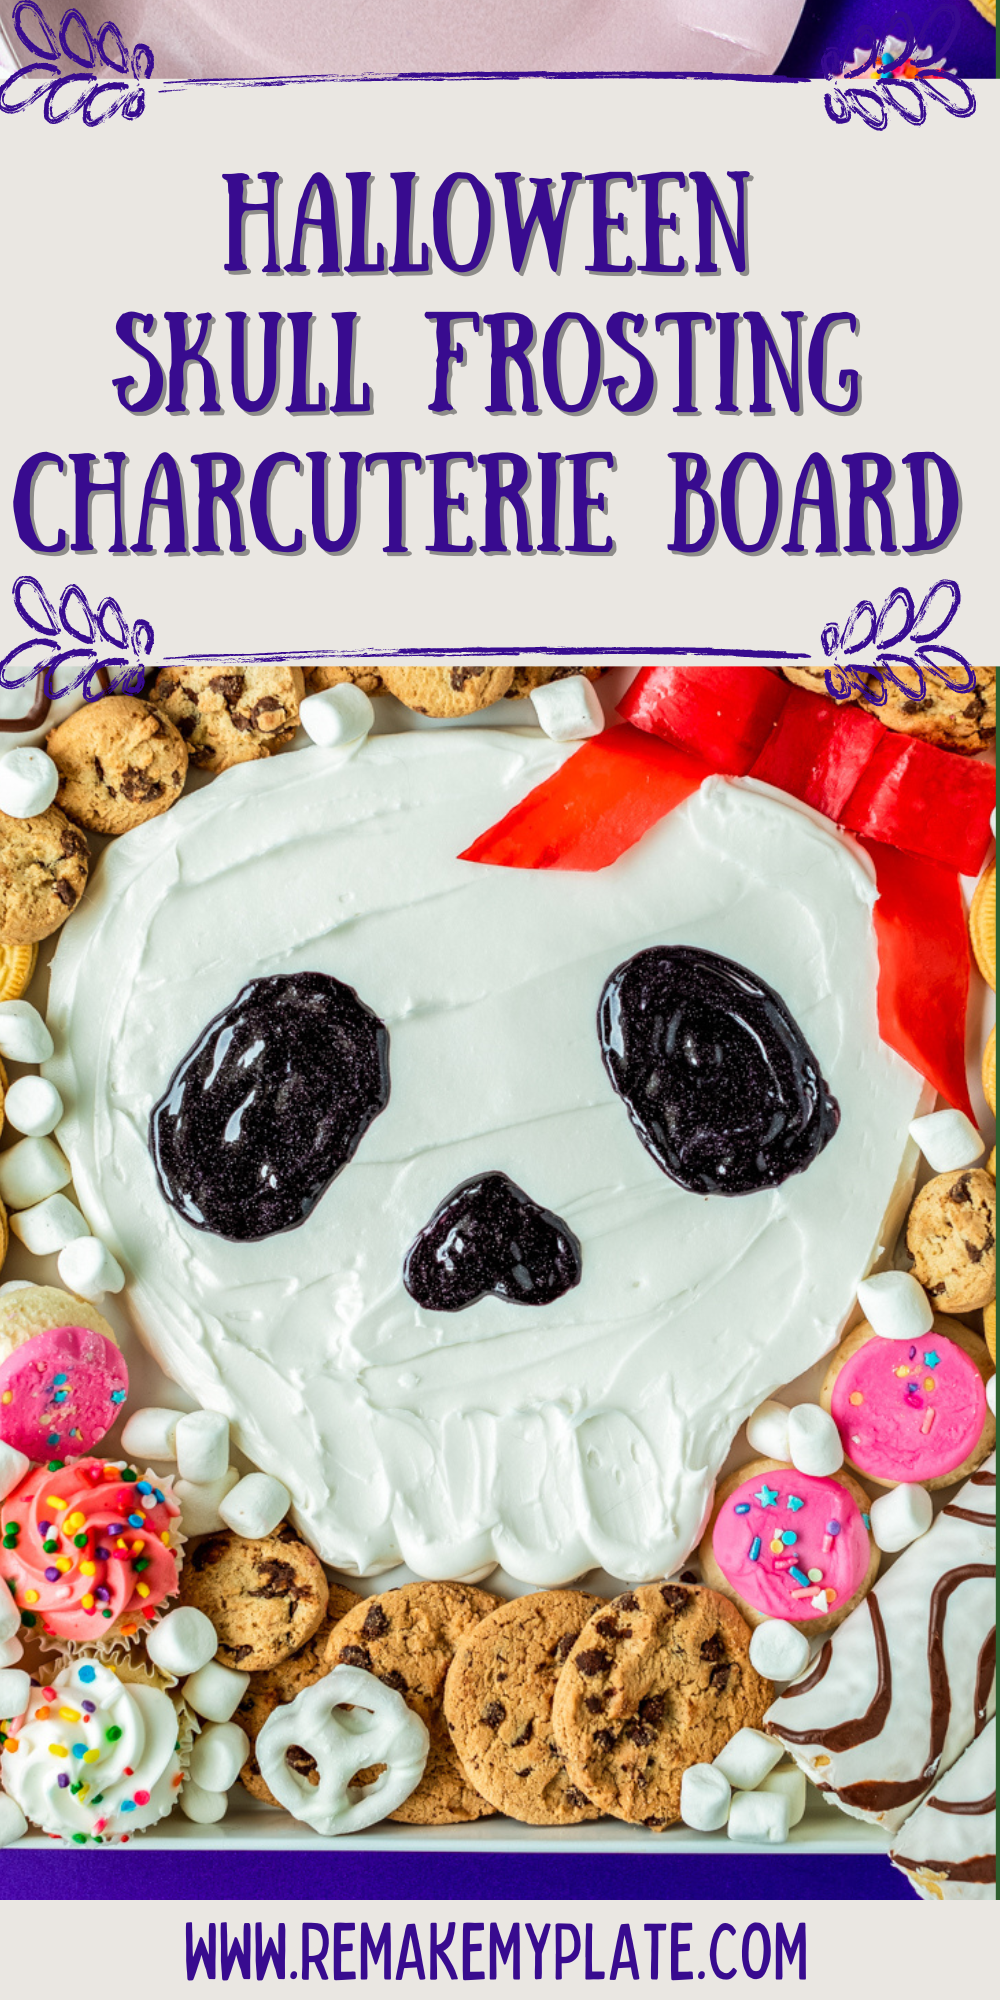
Trace the skull shape on the parchment paper and cut it out. Secure it to your serving tray or charcuterie board with a dab of frosting. Trace the outside of the template with frosting.
Remove the parchment paper. Then fill the entire skull shape in using the the frosting.
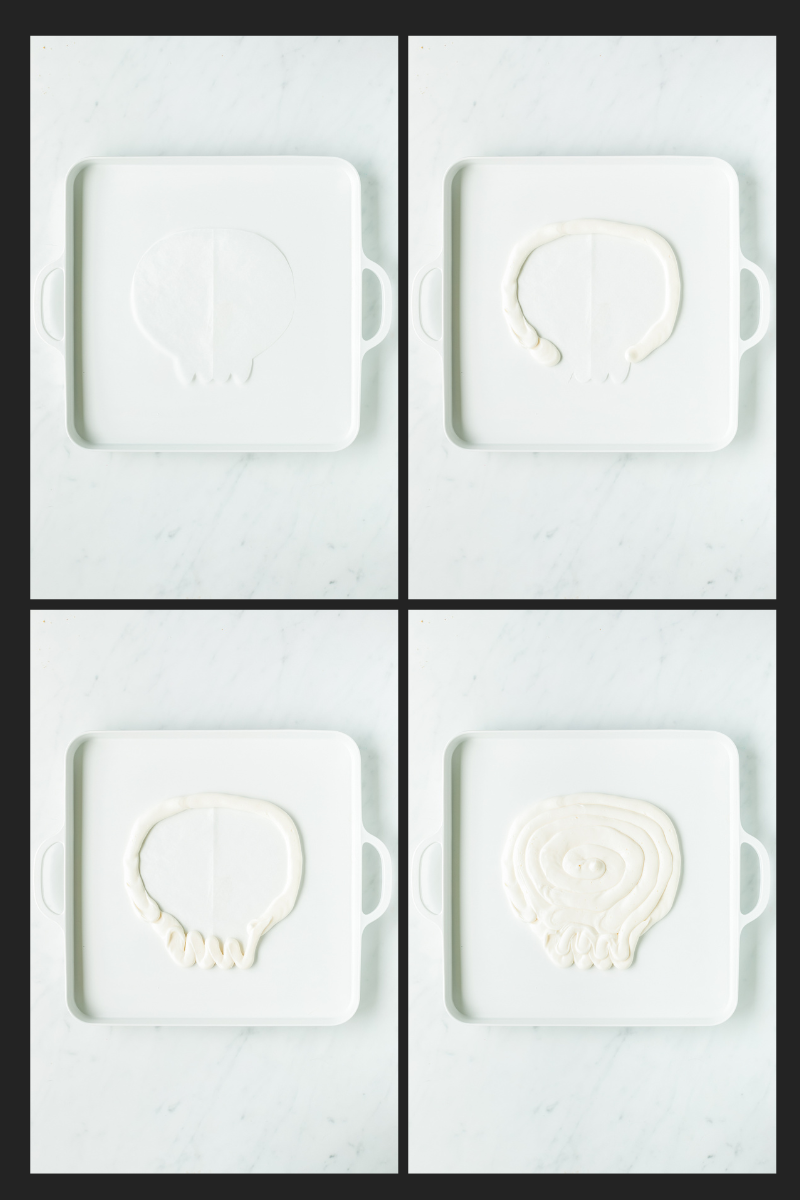
Use an offset spatula to smooth the surface of the frosting and to make lines at the bottom of the skull to define where the teeth would be located.
Use the black sparkle gel to create two oval shaped eyes and make an upside down heart shape to be the nose.
Place the Fruit by the Foot bow on the top right of the frosting skull.
Add Zebra cakes to the top left and bottom right corners.
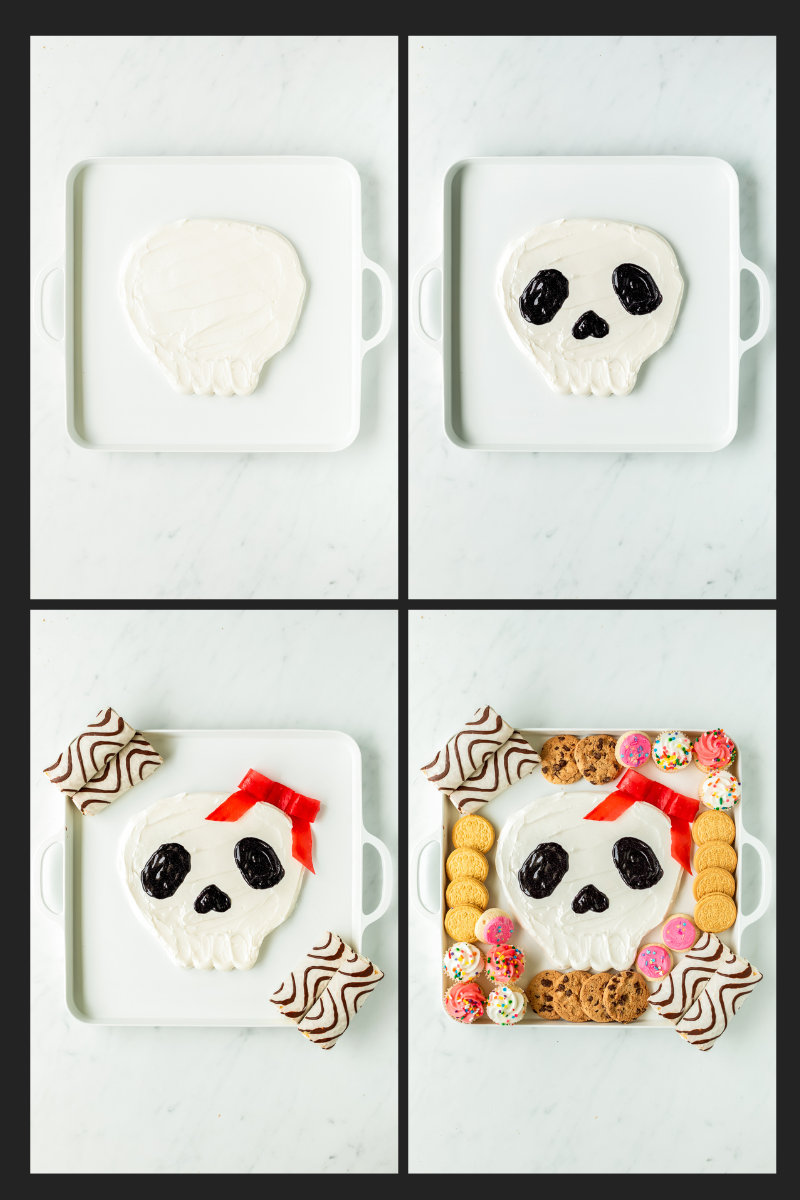
Add mini cupcakes to the top right and left right corners.
Add Golden OREO cookies to the left and right sides of the platter.
Add Chips Ahoy! cookies to the top and bottom of the platter.
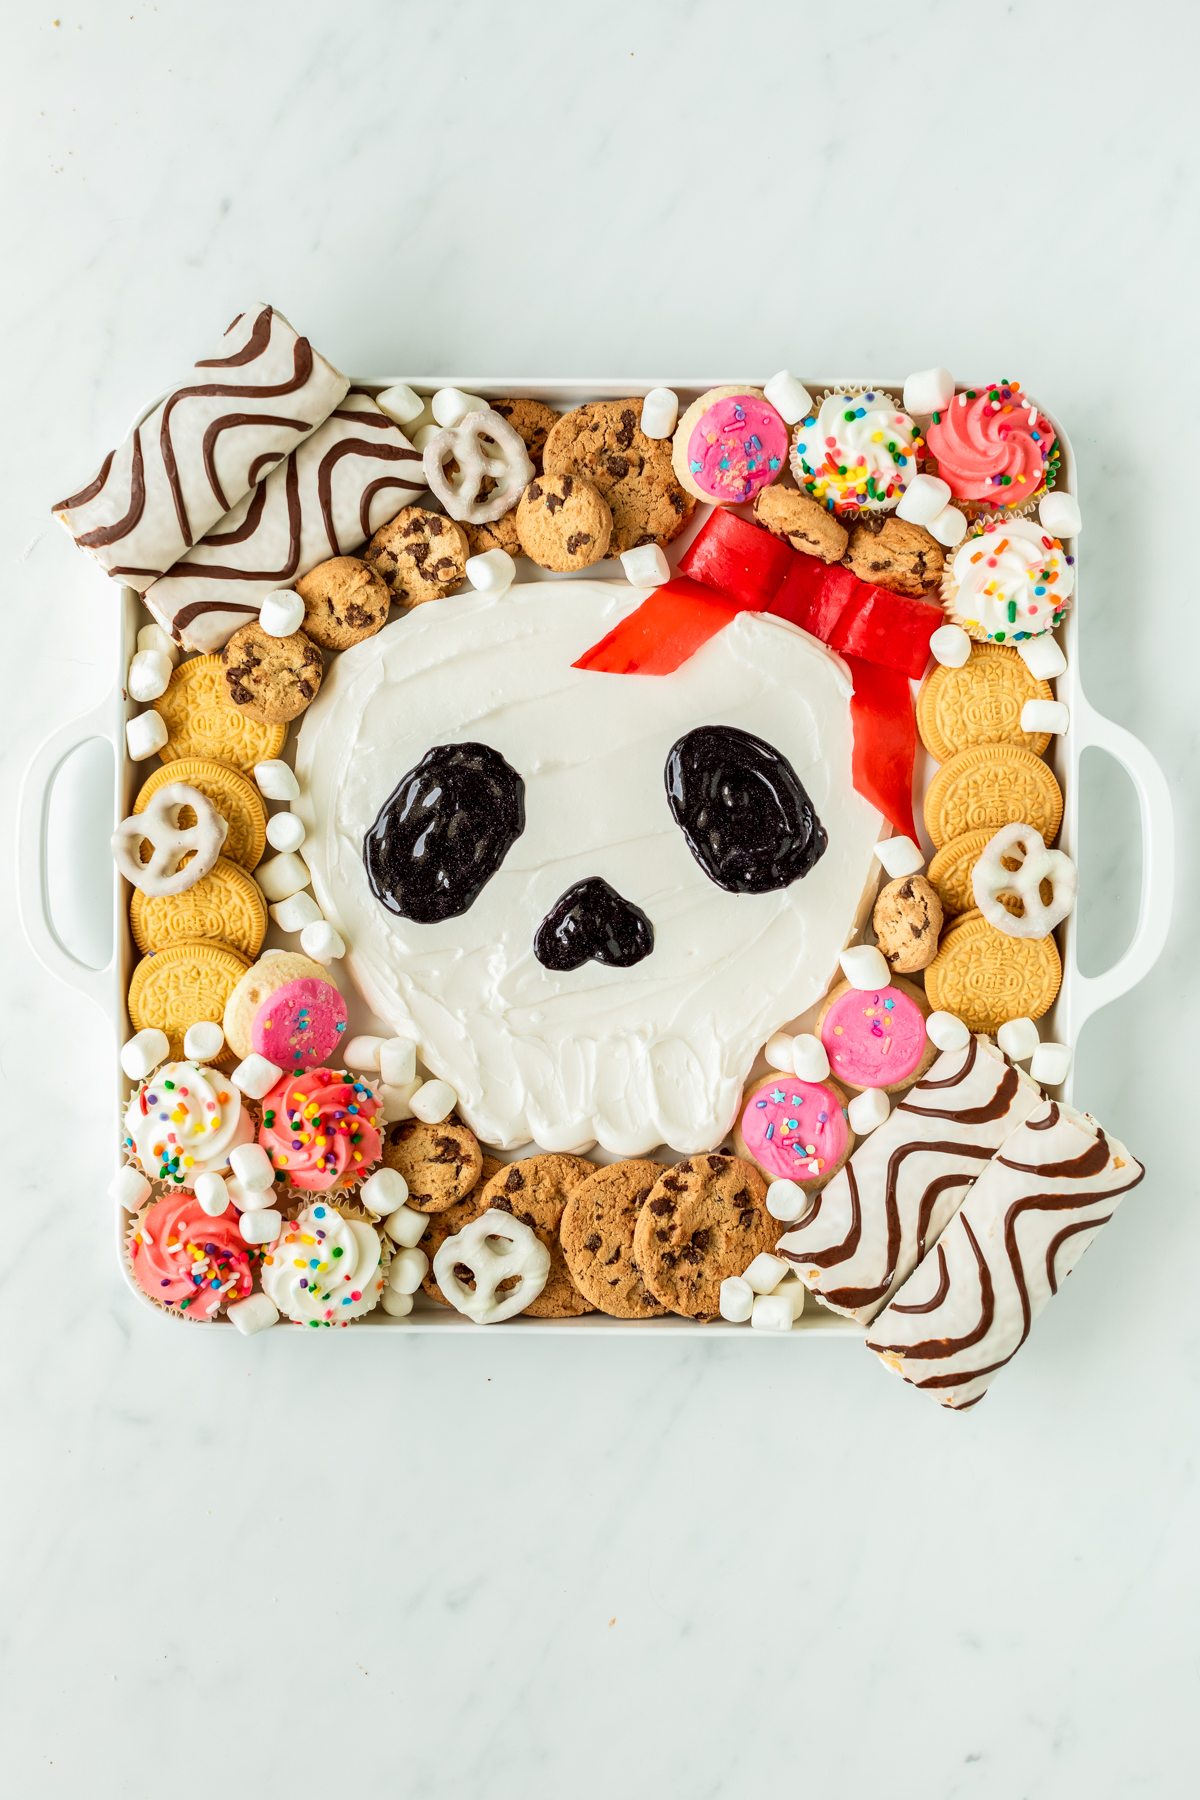
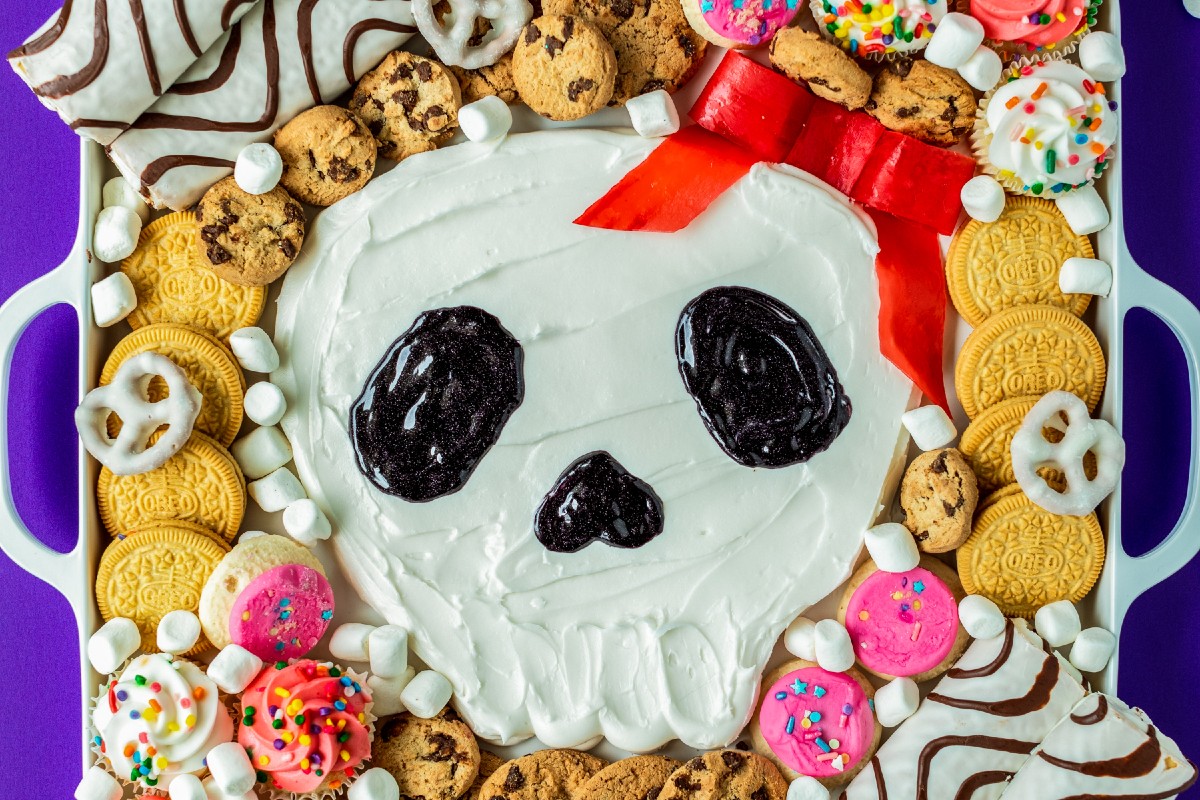
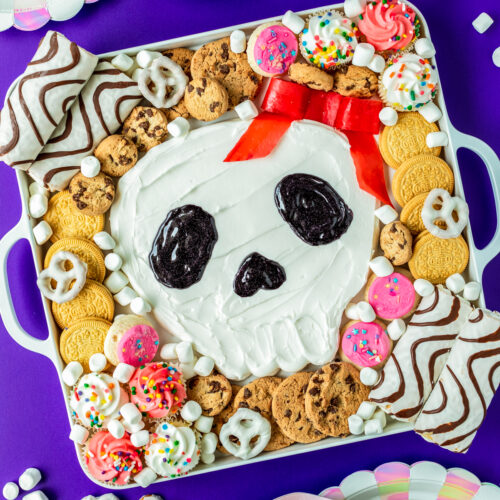
Fill in with rest of open white space with mini frosted cookies, mini chocolate chip cookies and pretzels.
Fill in all remaining empty spaces with mini marshmallows or small Halloween candies.
Serve the Frosting Board with spoons and plates for all to enjoy.
Here’s some tips and tricks for making charcuterie boards.
Can I use different types of candy or treats on the board?
Yes you can!
You can easily swap out the snacks, cookies and marshmallows for your favorite treats. Go with a color scheme (pink, red and white treats) or with a snack theme.
Feel free to use your favorite Halloween candy and treats for this Halloween snack board. I like to swap out the mini marshmallows for candy corn, gummy worms, black licorice, mini pumpkins that you find in the Brach’s Mellowcream Harvest Mix.
I’ve seen foiled wrapped candy that looks like chocolate skull or candy eyeballs. These are perfect if you are going for a more spooky vibe. Use these small candies to fill in the empty spots on your board.
You can also fill in the spots on your board by using Halloween decorations such as plastic spiders and other small Halloween themed items. Check out your local dollar store for small packages of these items.
Where to buy a charcuterie board?
You can find charcuterie boards online at Amazon, at Walmart and at many home goods stores. You can find a wide range of wood cutting, metal and plastic cutting boards or serving boards that can be used to make a charcuterie board.
You can find the serving tray that was used in the above pictures here on Amazon (affiliate link).
Check out this rectangular metal serving tray at Walmart. It’s a perfect size for small to medium gatherings (10 to 12 people) and you can see it used in these other charcuterie snack boards:
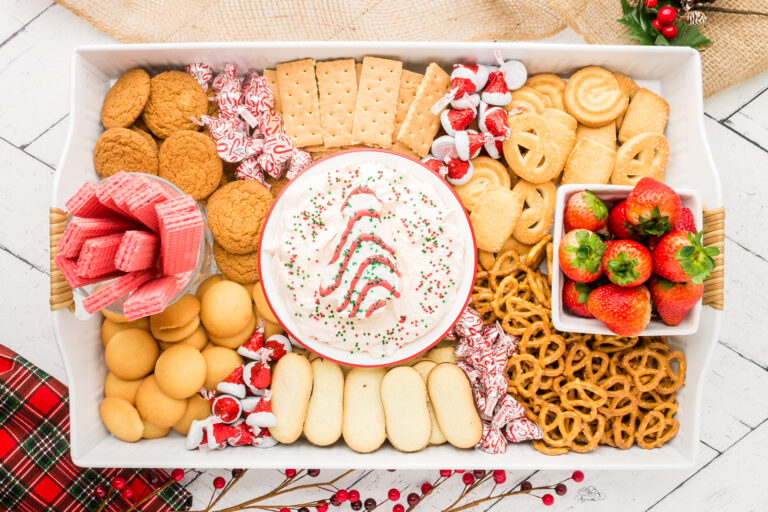
Christmas Tree Dip Charcuterie Board
Patriotic Flag Cheese and Dessert Board
I don’t have a board or platter. What can I use?
No board or platter available? No worries. You can easily use a baking sheet in place of a platter or charcuterie board. If your baking sheet has an raised edge that will help keep everything on the board.
Is your baking sheet discolored from use? You can line the baking sheet with aluminum foil if desired to hide any discoloration.
Don’t have a tray with an edge? You can also use a wooden board, cutting boards or even a baking sheet in place of the tray.
Baking sheets are a simple charcuterie board that have an edge which helps keep the different items in place. Its an inexpensive charcuterie board swap as most people have baking pans in their homes. This is a great way to save money if you are on a tight budget or don’t want to buy a board.
Looking to try other charcuterie boards? You may also like these:
Jarcuterie (Charcuterie In A Cup)
30 Christmas Charcuterie Boards
Serving more than 8-10 people? Then add some additional snacking items in small bowls around the main platter.
Can I make this board ahead of time?
As this board is made with shelf stable items it’s easy to make this a day or two ahead of time. You will want to wrap your board well with plastic wrap to keep the cookies and snack cakes from going stale.
To keep the plastic wrap from wrecking the frosting skull try placing some wooden picks into the frosting so they are sticking up. Then wrap your board with the plastic wrap. The toothpicks will hold the plastic wrap off of the frosting.
Try this recipe and love it? Review it by clicking the star rating ⭐⭐⭐⭐⭐ on the recipe card! This helps other readers to find this recipe since the recipe rating will encourage search engines, such as Google, to suggest it to others. This helps support Remake My Plate as we are a reader supported publication.
How To Make Easy Halloween Charcuterie Board Skull

Equipment
- Large Serving Tray at least 12 x 12
- parchment paper
- Disposable Pastry Bag
- Large Round Piping Tip
- Offset Spatula
Ingredients
- 1 Fruit By The Foot strawberry
- 2 Ready To Use Buttercream Frosting white, 16 ounce tubs
- 1 tube Wilton Black Sparkle Gel
- 4-6 Little Debbie Zebra Cakes
- 6-8 Mini Cupcakes
- 8-10 Golden Oreo Cookies
- 6-8 Chips Ahoy Cookies full sized
- 8-10 Mini Pink Frosted Cookies
- 12 Mini Chocolate Chip Cookies
- 12 White Chocolate Covered Pretzels
- 1/2 cup mini marshmallows
Instructions
Make the bow
- Start by preparing the bow using the Fruit By The Food. Cut a strip out to make a loop for the base of the ribbon. Use a dab of frosting to glue the ends together (frost the pieces together in the middle as it will be covered with the next piece).1 Fruit By The Foot
- Cut a small rectangle to wrap around the center of the loop and use frosting to secure it.
- Cut two equal strips and secure them to the bottom of the ribbon base. Trim the bottoms at an angle to complete the bow. The picture below shows the bow and the hanging pieces of the ribbon before they are attached.
- Take the remaining strip and cut in half. Roll each piece and insert them into the center of the bow loops to help give them shape. Adding in these rolled up pieces keeps the loops from being pressed flat and helps them to stand up.
Skull Template
- Print out the skull shape from the PDF file that you can download below.
Put Together Charcuterie Board
- Fit a pastry bag with Round Pastry Tip and fill with all of the white frosting.2 Ready To Use Buttercream Frosting
- Trace the skull shape on the parchment paper and cut it out. Secure it to your serving tray or charcuterie board with a dab of frosting. Trace the outside of the template with frosting.
- Remove the parchment paper. Then fill the entire skull shape with the frosting.
- Use an offset spatula to smooth the surface of the frosting and to make lines at the bottom of the skull to define where the teeth would be located.
- Use the black sparkle gel to create two oval shaped eyes and make an upside down heart shape to be the nose.1 tube Wilton Black Sparkle Gel
- Place the Fruit by the Foot bow on the top right of the frosting skull.
- Add Zebra cakes to the top left and bottom right corners.4-6 Little Debbie Zebra Cakes
- Add mini cupcakes to the top right and left right corners.6-8 Mini Cupcakes
- Add Golden OREO cookies to the left and right sides of the platter.8-10 Golden Oreo Cookies
- Add Chips Ahoy! cookies to the top and bottom of the platter.6-8 Chips Ahoy Cookies
- Fill in with rest of open white space with mini frosted cookies, mini chocolate chip cookies and pretzels.8-10 Mini Pink Frosted Cookies, 12 Mini Chocolate Chip Cookies, 12 White Chocolate Covered Pretzels
- Fill in all remaining empty spaces with mini marshmallows or small Halloween candies. Serve the Frosting Board with spoons and plates for all to enjoy.1/2 cup mini marshmallows
Try serving some of these delicious, fall recipes at your Halloween party:
Want to get new recipes sent directly to your inbox? Then subscribe to our newsletter (see below) and be the first to know when we post a new recipe as well as get weekly shopping, cooking and meal planning tips. Follow me on Pinterest where you can find links to our recipes as well as other recipes you and your family will enjoy.
This post may contain affiliate links. Please see our disclosure policy. If you click on the banner below you will be taken directly to my Etsy shop to see the digital items currently listed.